Managing company settings
Company settings include options to control your company name and logo, as well as account-wide scheduling and alert options.
Accessing company settings
To access your company settings you must have permission to access the area.
Go to Admin > Company Settings. You can find Admin under the drop down menu at the top left of the screen.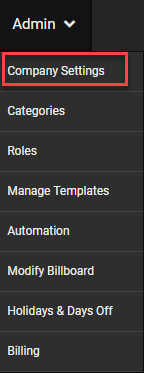
Modifying company settings
General

- Company Name: The name of your company. This name is displayed on the Home page.
- Main Account Contact: This is the registered user who has authority over the account. The Main Account Contact can only be changed by the current main account contact.
- Company Logo: Click Select to search for and add your company logo. This logo is displayed on the Home page. To remove a previously added logo, select the Remove current logo checkbox.
- Word for employee: Enter the word your company uses to describe the crew (e.g., “employee” or “representative”).
- Default Location: This allows you to set your default location.
- Date Format: This allows you to choose which date format you would like to use, American or European
- Time Format: This allows you to choose which time format you would like to use, Standard or Military
Scheduling
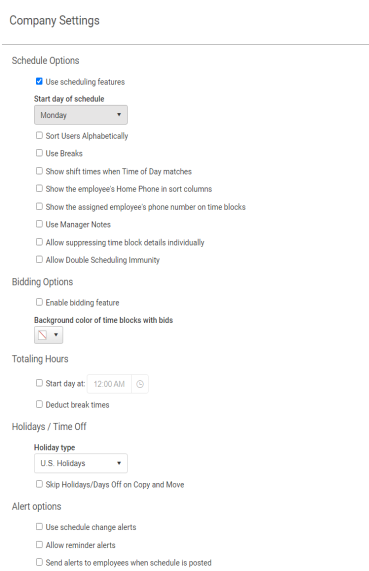
- Scheduling Options
- Use scheduling features:Check this box if you are using the scheduling module, i.e., all the employee scheduling capabilities of the system. You may want to uncheck this, if you are using WorkSchedule.Net as an attendance solution only.
- Start day of schedule: Select the start day that displays in the Schedule module. For example, if you select Monday, this is what appears on the Schedule.

- Sort Users Alphabetically: Enabling this option will automatically sort the Users list by last name. Leaving this option disabled will allow you to manually sort users by dragging and dropping them in the Users area.
- Use Breaks: Enabling this option will turn on the Breaks feature in the Time Block Edit Pane. This allows you to schedule breaks for your employees.
- Show shift times when Time of Day matches: Enabling this option show shift times in the time block even if they match the time of day.
- Show the employee's Home Phone in sort columns: Enabling this option shows the employee's home phone number in the sort column, if sorted by employee.
- Show the assigned employee's phone number in time blocks: Enabling this option shows the employees cell phone number in the time block. The employee must have a SMS number listed in Profile Setting.
- Use Manager Notes: Enabling this option will turn on the Notes features in the Time Block Edit Pane. This allows managers to add notes to the time block.
- Allow suppressing time block details individually: This feature allows the administrator to decide if they want to show start and end times for each individual time block. If selected a Display tab will be added to the time block edit pane allowing you to choose from one of three options: Show Start and End Times, Show Start Time Only, or Show none.
- Allow Double Scheduling Immunity: This feature allows the administrator to make specific time blocks immune from double scheduling conflicts by adding a checkbox to the time block edit pane. When this option is turned on for a specific time block, it cannot be in violation of a double scheduling conflict, nor can it cause another time block to be in such a violation
- Bidding Options
- Enable bidding feature: This feature allows employees to request to work a particular shift. Employee must be allowed to sign up for open shifts, see Creating roles for more information. This feature is used in conjunction with the eliminating rule, Only Schedule Bidders
- Background color of time blocks with bids: Allows you to select the background color for these time blocks. The background color will only appear on the manager side.
- Totaling Hours
- Start day at: Enter a time in the box that each day begins, this is used for the purpose of totaling hours.
- Deduct Break Times: Enabling this option will deduct break times from hours total.
- Holidays/Time Off
- Holiday type: You can choose what type of Holiday type from the drop-down menu.
-
Skip Holidays/Days Off on Copy and Move:Enabling this option will skip specifiable marked days as a day off or holiday when a time block is moved or copied.
- Alert Options
- Use schedule change alerts This option turns on schedule change alerts in general for this company account. The system will send an automatic email to the affected employee when the manager changes the posted portion of his/her current schedule, alerting the employee of the change. It will also alert employees when the schedule is posted or un-posted. See Schedule Change Alerts for more information.
- Allow reminder alerts: Enabling this option allows managers to set reminders to be sent to employees before their scheduled shifts
-
Send alerts to employees when schedule is posted: Enabling this option allows the system to send alerts to employees when the schedule is posted.
Click Save to confirm the changes.
Swap/Sign Up
-
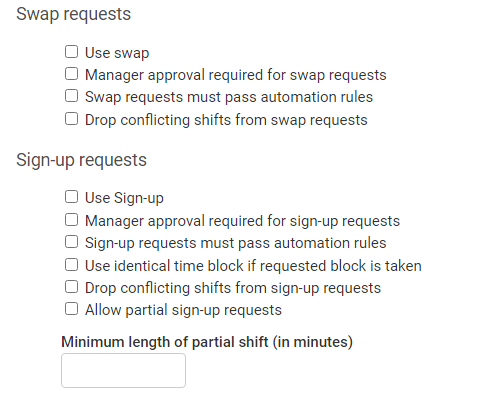
Swap requests
-
Use swap:Checking this box will enable the swap feature.
-
Manager approval required for swap requests:Enabling this option requires managers approval for swaps.
-
Swap requests must pass automation rules:Enabling this option requires swaps to follow automation rules. Note: This features is used in conjunction with Automation. See Automation for more information.
-
Drop conflicting shifts from swap requests: Enabling this option allows for the approval of a partial swap request when more than one day is requested. The system will drop the swap or swaps that brake a rule and allows for the rest of the swaps in the request to be approved. Note: This functionality will only work on the initial request.
-
-
Sign-Up requests
- Use Sign-up:Checking this box will enable the sign-up feature.
-
Manager approval required for sign-up requests:Enabling this option requires managers approval for sign-ups.
-
Sign-up requests must pass automation rules:Enabling this option requires sign-ups to follow automation rules. Note: This features is used in conjunction with Automation. See Automation for more information.
-
Use identical time block if requested block is taken: Enabling this option allows the system to replaces the requested time block with another identical open time block if the requested time block has already been filled.
-
Drop conflicting shifts from sign-up requests: Enabling this option allows for the approval of a partial sign-up request when more than one day is requested. The system will drop the sign-up request or requests that brake a rule and allows for the rest of the sign-up requests to be approved. Note: This functionality will only work on the initial request.
-
Allow partial sign-up requests: Enabling this options allows employees to sign up for partial shifts, provided permissions allow it. See Creating Roles for more information.
-
Minimum length of partial shift (in minutes): Allows the user to set the minimum length of the partial shifts. The length must be entered in minutes.
Click Save to confirm the changes.
Heat Maps
Having access to Company Settings gives permission to modify the heat maps used for Yearly View.

Select the Type of heat map using the drop-down in the top right corner
Available options include:
- Number of time blocks
Click Add or the Edit pencil icon (
 ) to add a new heat map value or modify an existing heat map item.
- Value The value for the type that the background color represents.
- Background Color: The background color that is shown when the value is met.
For example, a value of 20 for Number of time blocks would mean if a single day had 20 time blocks scheduled, the set background color for that day will appear.
Availability
-
Availability Options
- Use Availability Feature:Checking this box will enable the availability feature. See Availability for more information.
Attendance
-
Attendance Options
- Use Attendance Features:Checking this box will enable the attendance features. See Attendance for more information.
- Find the matching shift within X hours upon clock-in: Enables the system to look in the current schedule to find the matching shift that was clocked in for and assign the category items to the attendance.
Time Off
-
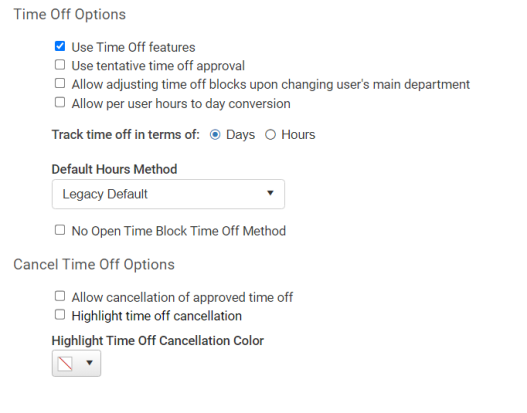
Time Off Options
- Use Time off feature:Checking this box will enable the time off feature. See Time Off for more information.
- Use tentative time off approval : Checking this box allows you to give a “tentative” approval of time off, meaning that the final decision regarding the time off approval has not been made, but is likely.
- Allow adjusting time off blocks upon changing user's main department: Checking this box allows the changing of old time off blocks whenever the user changes their main dept. This allows managers who have access to their new department to see historic time off data for the employee.
- Allow per users hours to day conversion: Checking this box allows the number of hours in a day to be adjusted per user.Note: We recommend calling support for more information before using this feature
- Track Time off in terms of: This allows you to select how you want to track time in terms of day or hours.
- Default Hours Method: Enables the option to set how you want the hours to be defaulted for each time off request.
- Legacy default: This is the default option. When selected, the number of hours requested by an employee will be rounded to either their total Hours Per Day under their Time Off in their User Account, or to half of these total hours. If the number of hours an employee requested off is greater than 75% of their total Hours Per Day then the number of hours deducted from their Time Off Account will be the total number of hours. However, it the number of hours the employee requested off is less than or equal to 75% of their total Hours Per Day, then the number of hours will round to half of their total Hours Per Day. For example, if an employee's Hours Per Day is 8 and they request 6.5 hours off then the hours deducted from his/her Time Off Account will be rounded to 8. However, if the same employee requests off 5.5 hours, then the hours deducted from his/her Time Off Account will be 4.
- From start time to end time: This sets the number of hours that the employee requested off to the exact number of hours between the specified times they requested to have off. For example, if they request off from 9am to 4pm on Monday, their Time Off Account will be deducted 7 hours.
- By employee request: This option allows employees to specify the number of hours they feel should be deducted from their time off ledger. For example, they could take off 24 hours, but request 8 hours to be deducted from their Time Off Account. Of course, the manager can override this value.
- Based on user default: This option allows the manager/admin to set the amount of hours each employee will have deducted by default. Meaning, an employee can request off 24 hours, but the amount of hours that is deducted in their Time Off Account will be their default paid hours from their user record, which can be different for every employee.
- Based on Time Off reason: This choice allows the manager/admin to edit Time Off Reasons so that when an employee requests time off for that specific reason, it will default to a set number of hours for that reason, regardless of the employee.
- Cancel Time Off Options
- Allow cancellation of approved time off: This allows employees to request existing approved (or tentative) time off to be canceled. When cancellation is approved the time off block(s) are simply removed and employee and admin notified, unless the highlight time off cancellation feature is enabled. Note: This does not attempt to re-assign the employee to a shift
- Highlight time off cancellation: This feature highlights the canceled time off blocks instead of the standard functionality of removing the time off block.
- Highlight Time Off Cancellation Color: Allows you to select the color the canceled time blocks will be.
Payroll & Overtime

-
Payroll & Overtime Options
- Overtime Multiplier:This number will be multiplied by the employee's regular pay rate to calculate the overtime rate. If you do not want overtime pay, enter 1 into this box.
- Weekly Overtime Threshold (in hours): Any hours worked past this amount in a given week will be counted as overtime and will use the overtime pay rate. Note: WorkSchedule.Net only handles a single weekly overtime threshold amount. We do not handle any other overtime laws or rules, such as a daily threshold. Please check with your state government for any additional overtime laws to ensure full compliance with state and federal regulations.
- Payroll Company Code:This section is for companies who use ADP Payroll Export.
Automation
-
Availability Options
- Use Automation Features:Checking this box will enable the automation features. See Automation for more information.
Notifications
- SMS: Enables functionality to receive alerts via text messages.
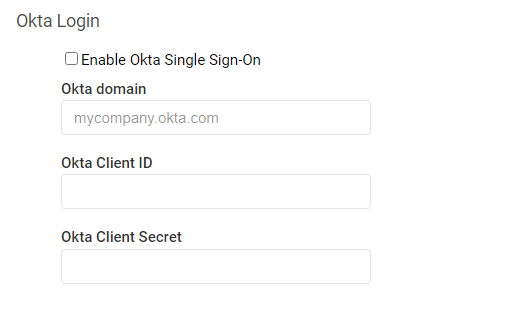
Single Sign-On
-
Okta Login: This section allows you to set up single sign on using Okta. See Okta for more information
Testing
-
Sandbox mode: enables sandbox features. Sandbox mode allows users to get to know the system without concern that a user will think it is real world data or activity. Banners on the top of every page state that it is a test, as do banners at the top of the notifications (SMS and email).
-
Redirect all messages to:enables the user to redirect all notifications to one user while in sandbox mode.
-
Click Save to confirm the changes.
Copyright © 2021 Program Works